Showing posts with label GF. Show all posts
Showing posts with label GF. Show all posts
Wednesday, July 26, 2017
Cloud Bread

Cloud Bread is light, airy and gluten free. It is easy to make and according to the original recipe it can be topped with anything from jam to cheese. As you see below, I made mine into a hamburger bun. I LOVED IT! The bun WAS light and airy and it didn't detract from the delicious taste of the bar-b-qued hamburger AND unlike us gluten free eaters that wrap the hamburger in a lettuce leaf, the meat and the accompaniments don't slide out of the bun. It was great.
I suggest using the bread the day it is made. I put mine in a plastic bread bag overnight and it was very limp and spongey the next day.

Ingredients:
3 eggs, separated
1/4 tsp baking soda
3 TBSP mayonnaise
1. Heat oven to 300°F and line 2 baking sheets with parchment paper.
2. In a bowl, combine egg whites and baking soda. Beat with a mixer until stiff peaks form.
3. In a separate bowl, combine mayonnaise and egg yolks. Beat until smooth.
4. Gently fold into beaten egg whites.
5. Use a 1/3 measuring cup to pour mixture onto baking sheets, leaving space in between each round.
6. Bake 30 minutes until firm.
I believe this recipe made 8 rounds perhaps 10 ... I can't exactly remember but no less than 8.
Smoothie


This recipe is especially for Little Jenny. It was passed along to me from Shaun. This is a favourite of the twins and is what SR ate when on the Whole30 Diet. I began making it when I was on the same diet and loved it so much it became my breakfast go-to. Was good for our diet as there is no added sugar in this recipe and it tastes good.
I have a small individual sized drink blender - 400 ml (about 14 fl. oz). I made smoothies for the twins in a Ninja blender and it made enough for the two of them. The only difference is I use 1/2 a banana and for the twins I used a whole one. Otherwise the directions are the same.
In an empty blender add:
1/2 (or one whole) banana
1 peeled tangerine or orange (I like tangerines as they are seedless)
Frozen fruit - I use President's Choice 4 Fruit Blend but use your choice of fruit
(The frozen fruit takes the place of ice cubes and chills the smoothie)
Cold Water to the top line on the blender (mine is at 400 ml)
Now, your choice of fruit is your own. I sometimes add 1/4 scoop of powdered protein. Jennifer's dietician suggested a TBSP of peanut butter. Try whatever you enjoy or think may taste good in a smoothie.
Turn on the blender and blend for the count of TEN. This is a great thing to do with the kids. When blended pour into a glass and enjoy.
Monday, May 15, 2017
Healthy Date-Nut Balls

Sorry, again, even though I made two batches on two separate occasions, we ate them all before I took a photo. This is similar to those Larabars I purchase regularly. Not many Ingredients and all healthy.
INGREDIENTS:
1/2 Cup Dates (this is about 7 dates)
1/2 Cup Walnuts
1 Scoop Chocolate Protein Powder (I used Vanilla, I am not that chocolatey)
2 TBSP Cocoa Powder
2 TBSP Applesauce
1 TBSP Honey
Cumbed nuts to coat
DIRECTIONS:
- In a food processor blend the dates and walnuts to a crumb consistency.
- In a bowl mix together the Protein Powder and Cocoa Powder.
- Stir in the date/nut mixture, then stir in the Applesauce and Honey.
- Roll into bite-sized balls (your hand will become very gooey) and roll these balls in the crumbed nuts to coat.
- Serve.
Easy Banana Oatmeal Muffins

Whew! Took this photo with the last muffin sitting there waiting to be eaten. Funny how many gluten free recipes that are made with banana, and most of them so tasty. This one is super easy and you don't have to think about flour or a flour substitute at all.
INGREDIENTS:
1 Cup Yogurt
2 Eggs
2 Ripe Bananas
2 Cups Gluten Free Rolled Oats (I used large flake oats as I am wheat free, not totally gluten free)
1/4 Cup Brown Sugar
1/2 tsp Baking Soda
1-1/2 tsp Baking Powder
1/2 Cup Chocolate Chips (Optional)
DIRECTIONS:
1. Preheat oven to 400°F and grease muffin pan well or use parchment paper muffin cups.
2. Add all ingredients except for chocolate chips to your blender or food processor (which I used) and
blend until smooth.
3. Stir in chocolate chips if using. (I used, yummy!)
4. Pour into muffin cups and bake for 15-20 minutes.
5. Allow to cool for 10 minutes then enjoy!
Monday, April 24, 2017
BANANA ONLY ICE CREAM

BANANA (ONLY) ICE-CREAM
This is a no-cream, no-milk, gluten-free, no-guilt version of a well loved dessert - Ice Cream. With one ingredient (or more if you wish) you can make this delicious easy dessert to serve as an excellent finale to your meal.
Ingredients
1 Large Ripe Banana
Directions:
1. Peel banana and cut crosswise into coin shapes. I once cut in large pieces and found the smaller, coin shapes easier to process. Put cut banana in a an air tight container (glass, plastic, plastic bags etc.) and freeze at least 2 hours or overnight.
2. Add frozen bananas to a food processor (you can add extra fruits at this point too to blend into the mixture) and process until creamy (ice cream consistency), scraping down the sides occasionally.
3. Serve and enjoy!
Note: You can easily add fruit to the processor. I added strawberries, then topped the dessert with fresh sliced strawberries and blueberries. It was delicious. I also added blueberries but found the skin on the blueberries a bit annoying, even though it tasted delicious. I also had just bananas. Delicious also. You could try adding cocoa powder, chocolate chips, a few nuts, cinnamon, or whatever your imagination can think up.
Friday, February 24, 2017
Gluten Free Banana Almond Bread

Seems my most delicious baked gluten free recipes are banana bread. Well, here is another one. Was pleased it used Almond Flour ae I am not partial to baking with the rice (or many other varieties of) flour. Below is a picture of the flour I used for this recipe. This was labelled "Raw" as the dark outer skin of the almond was not removed before grinding, therefore it is a bit heavier than normal ground almond flour, but it worked well in this recipe. I ordered it from Well.ca the online grocery store that delivers right to your door (or Post Office Box now-a-days) free of charge.


And not on a cooking note, if you are wondering what is in the background of the above photo of my slice of banana almond bread ... it is the Queen.

She sits on my window sill and waves while it is daylight.
GLUTEN FREE BANANA ALMOND BREAD
2 Cups (260 g) Almond Flour
1/4 Cup (35g) Cornstarch
2 Tsp Baking Powder
1/2 Cup (115g) Unsalted butter, softened
(I used Becel Margarine; it was already soft)
1/2 Cup (105g) Sugar (I used Splenda and used a little less)
2 Eggs
1-1/4 Cups (310 ml) very ripe mashed bananas (about 3 bananas)
2 TBSP Sliced Almonds (I only had slivered)
1 TBSP Almond Extract (I used Vanilla)
As you can see I altered the original recipe on my first go-round and it worked out perfectly. Don't be afraid to add perhaps nuts to the batter or perhaps chocolate chips. I haven't tried that yet but am pretty certain it would work out well. Below are the instructions.
- Instructions:
- With the rack in the middle position, preheat the oven to 350°F (180°C). Butter a six-cup (1.5 litre) 10 x 4-inch (25 x 10 cm) loaf pan and line it with a sheet of parchment paper, letting it hang over both sides.
- In a bowl, combine the almond flour, cornstarch and baking powder. Set aside.
- In another bowl, cream the butter and sugar with an electric mixer. Add the eggs, one at a time, and beat until smooth. Add almond extract. At low speed, stir in the dry ingredients alternately with the mashed bananas. If adding chocolate chips or nuts, dust them with a bit of flour, then fold into batter. Spread the batter into the pan. Sprinkle with the sliced almonds.
- Bake for about 55 minutes or until the loaf is golden brown and a toothpick inserted in the centre comes out moist but without lumps of batter. My loaf was ready in about 40 minutes.
- Let cool completely before removing from the pan.
Friday, March 25, 2016
Spaghetti with Fennel
This is a nice twist on tomato based spaghetti. I watch David Rocco on TV whenever I can. He is not only gorgeous to look at but he makes cooking look easy. He doesn't weigh or measure his ingredients, just tosses some of this and a pinch of that into the pan. I like cooking like that. So I watched as he made Spaghetti with Wild Fennel to serve to his friends in Italy. I tried it and love it.
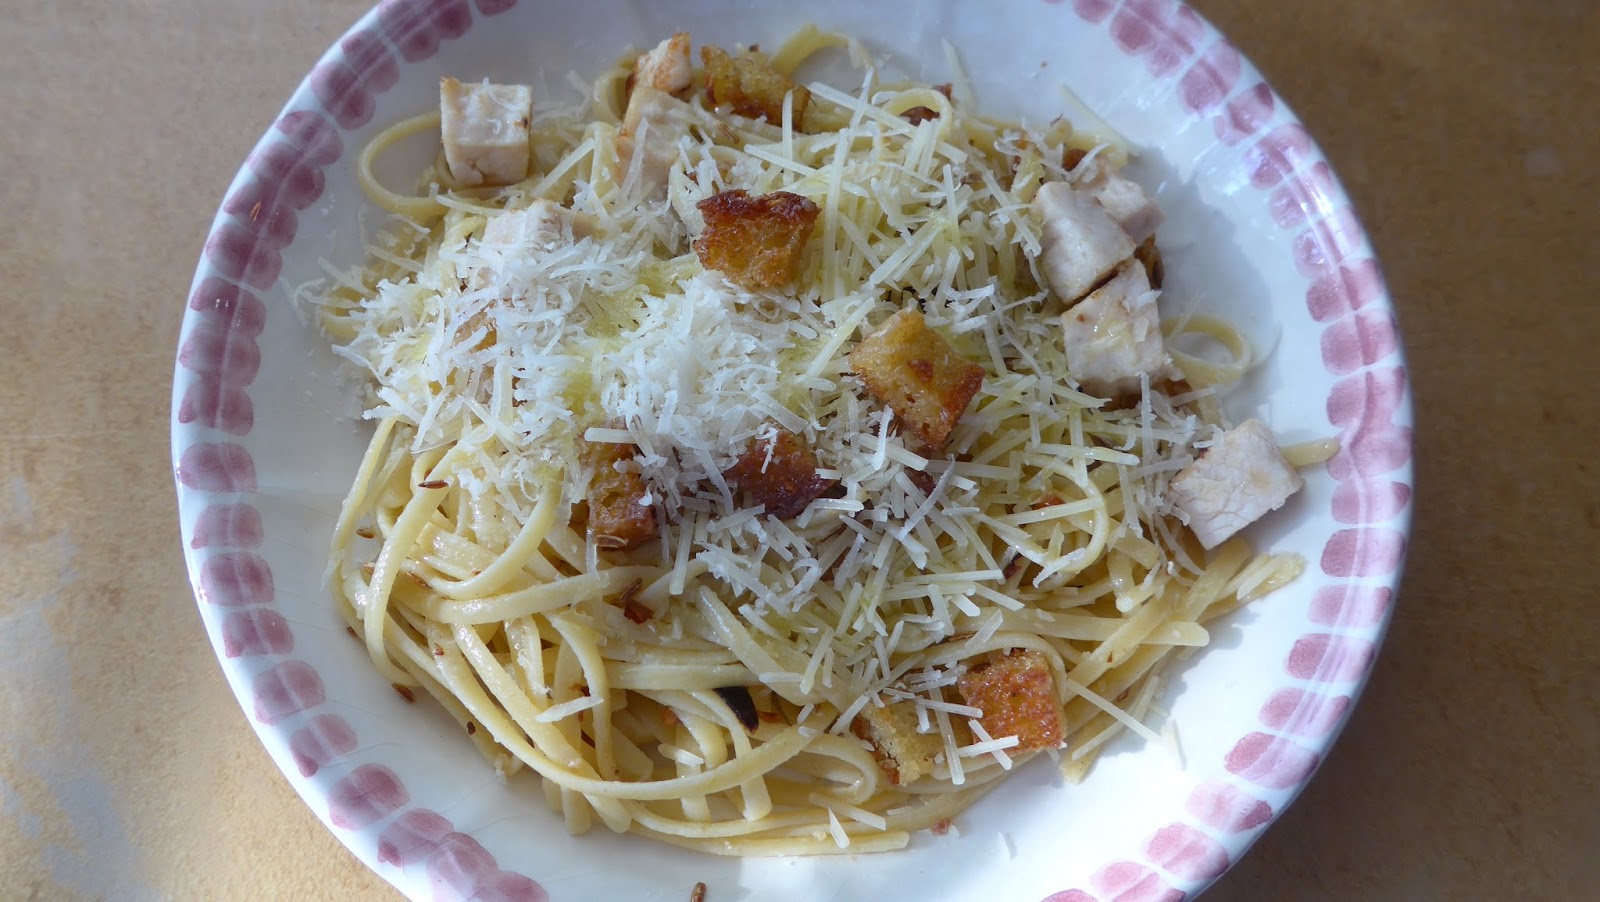
An easy dish to prepare and very tasty. As you can see, I used linguine (gluten-free of course) as I didn't have spaghetti pasta that evening and I also added cubed left over chicken which I added to the crouton pan to heat up.


I cubed my bread to a size I like. You can cut larger cubes or smaller cubes, your preference. I also chopped up some garlic (2 cloves).

I fried the cubed bread in olive oil along with the garlic.

My grated cheese was ready to go.

Voila! Dinner is served.
Ingredients:
All of these ingredients are approximate.
1 lb. spaghetti
3 TBSP Extra-virgin Olive Oil or a bit more
3 Cloves Garlic, chopped (I used 2, but also used 1/2 pkg of linguini)
1/2 Tsp Dried Chili Pepper Flakes
2 Tsp Fennel Seeds (I must have used a TBSP ... I love Fennel)
4 Oz. day old Bread, cut into cubes (the cube size is your choice)
Pinch of Salt
1 Small bunch of Wild Fennel
1/2 Cup freshly grated Pecorino (or other dry cheese, I used Parmesan)
Cook spaghetti pasta in rapidly boiling salted water to el dente.
In a pan, heat good quality extra virgin olive oil. Add a couple of cloves chopped garlic, some red chilli flakes, fennel seeds and simmer slowly to disperse the flavours.
Chop day old bread into cubes (big or small, the choice is yours) and fry them in the oil till golden. Add a bit of course salt.
Add the el dente spaghetti to the pan and finish cooking it in the olive oil sauce in the fry pan. Sprinkle with the extra wild fennel (if using), plate, then drizzle with a bit more olive oil and sprinkle on the grated cheese and enjoy.
Sunday, March 06, 2016
French Bread
French Bread
I have been making and/or buying Gluten Free Bread for two years now. So far, the best I have tasted is Udi's bread but is is close to $9 a loaf and the loaf is about 1/2 the size of regular wheat bread. Then is got this recipe. Finally, finally, finally, I made a loaf of bread that looks and tastes like a loaf of regular bread. I was so excited.

I didn't have a french bread pan so, as suggested, made my own.

Here is the finished product. A lot depends on how you make the pan and how much you smooth the top.
Ingredients:
2 Cups plus 2 TBSP GF Flour Mix (I used Pamela's All Purpose Flour)
2-1/2 Tsp Xanthan Gum
1-1/2 Tsp Sugar
1 Tsp Salt
2 Tsp Quick-Rising Yeast
1 Tsp Vinegar or Dough Enhancer
2 Egg Whites (room temperature)
1-1/2 Cups Warm Water (110-115 Degrees F)
Prepare a French Bread Pan by spraying with vegetable oil or curve a doubled piece of heavy foil about the length of your cookie sheet to form a mold and spray this.
In the bowl of your mixer, combine the flour mix, xanthin gum, sugar, salt and yeast. Whisk together to blend well. Add the vinegar, egg whites and water. Beat at medium speed for 3 minutes. Spoon dough into the mould to almost the full length. Smooth the top. Cover and let rise for 15 minutes. Preheat oven to 400 Degrees F.
Bake for 1 hour. Turn oven to 350 Degrees F and bake 15 minutes longer. To eat it hot and crusty, tear it apart; it won't cut until it's cool. The bread keeps for several days but the crust gets more tender with time.
Sourdough French: Add 1-1/2 Tsp Sourdough Starter to the liquids before beating them in.
My Gluten Free Flours Course
I went to a City run Course on Gluten Free Flours. I did learn a bit, but am still confused. I believe a lot of this is trial and error which can be quite expensive. Here is what I learned.
Make your own Flour Blends; Below are 4 varieties of flour mixture:
1. 1 Medium Flour + 1 or 2 starches
2. 1 medium + 1 heavy flour + 1 or 2 starches
3. 2 medium flour + 1 or 2 starches
4. 1 Heavy Flour + 1 or 2 starches
LIGHT (STARCHES):
Light starches blended with heavier flours help your baked goods be lighter, fluffier and chewier. Used on their own, they are great for thickening and binding. They have very little nutritional value to use sparingly.
* Arrowroot (use straight)
* Tapioca Starch (aka tapioca flour) - makes baking gummy, chewy, so cut with potato starch
* Potato Starch (do NOT confuse with potato flour - they are different)
* Corn Starch - good if you want a crispy coating then fry
MEDIUM
Medium flours have the original nutrient content of the grain or bean. They are light in flavour and are great assets to light, fluffy baking. They should be blended with a STARCH for best results in baking.
* Fava Bean
* Garbanzo Bean (aka chick pea) - use for savoury foods
* Millet (lighter than brown rice flour) --C
* Sorghum -- C
* Quinoa -- C
* Oat Flour - can use without a starch flour
* White Rice Flour (use sparingly as it has little nutritional value)
HEAVY
* Brown Rice Flour -- C
* Amaranth
* Coconut - absorbs liquid so use only in small additions
* Almond -- C
NOTE: C = KEEP COLD
My Instructor's Favourite Blend is:
2 Cups Brown Rice Flour
1/3 Cup Tapioca Starch
2/3 Cups Potato Starch
2 TBLS Coconut Flour
Use this mixture as 1 to 1 with wheat flour
Lastly, some interesting tips:
1. Use ground chews with a bit of water as a thickener for soups
2. Some good GF food web sites:
http://minimaleats.com
http://chocolatecoveredkatie.com
http://www.allergyfreealaska.com
3. Can't find the food you need or don't like shopping in grocery stores, you can order your
food on-line at https://well.ca . They are in Ontario but ship free of charge to most major
cities in Canada. Check their web site for details.
Quinoa Balls with Dip
Quinoa Balls with Dip

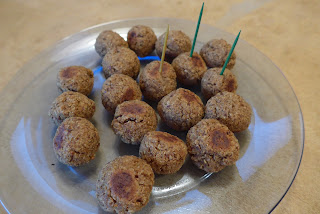

This is a great appie to serve. It is not only tasty but Gluten Free and Vegetarian!

Balls are baked on parchment paper.

Plated Balls.

Sorry, I keep forgetting to take a picture and by the time I remembered, half the plate was empty, but I'm sure you get the idea. Here they are served with dip and they were delicious.
Quinoa Balls with Dip
Ingredients for Quinoa Balls:
1 large Yellow Onion, diced
2-4 Garlic Cloves, smashed and salted
1-1/2 Cups Cooked Quinoa
1-1/2 Cups Pecans, skillet toasted (I used walnuts)
2 TBSP Coconut Flour
1/2 Cup Golden Raisins
1 Egg
1 Tsp Cinnamon
1/2 Tsp Ground Clove
1/2 Tsp Ground Turmeric
1/2 Tsp Sea Salt
Pinch Coarse Pepper
Preheat oven to 375 Degrees F.
Place raisins in a small bowl and cover with warm water to soften while you prepare remaining ingredients.
In a small bowl combine dry seasonings: cinnamon, clove, turmeric, salt and pepper and set aside.
In a small dry skillet, sauté nuts on LOW heat just until they become fragrant and lightly toasted (about 2-4 minutes), being careful to watch so they don't burn. Set aside.
In a separate large skillet set to medium-low heat, sauté the onions and garlic in some olive oil until translucent (about 8 minutes). Sprinkle the onion-garlic mixture with dry seasonings (cinnamon, clove, turmeric, salt and pepper) as it is cooking, mixing well to combine. Remove from heat.
When the onion-garlic mixture has cooled somewhat, add contents to the blender/food processor. Drain raisins, squeezing out excess liquid. Add drained raisins to onion mixture and process until the mixture is broken down and combined.
Add quinoa, coconut flour and toasted nuts and process until broken down and mostly combined (there should still be some texture, bits and pieces).
Put contents of blender/food processor into a large mixing bowl. Add egg and hand mix until well combined.
The mixture will be moist and sticky. If it is too difficult to work with (to form into balls) place in fridge for 20 minutes. (I've made it twice and both times was perfect to work with)
With the palm of your hands, roll about a tablespoonful of mixture into balls. Place on a parchment lined baking sheet and bake for 25-35 minutes until tops begin to brown and desired colour is achieve, shaking balls gently at the halfway mark. Be sure to keep an eye on these balls to prevent burning.
Remove tray from oven allowing the quinoa balls to cool slightly before serving with the yoghurt dip.
Store balls in fridge for up to three days.
Ingredients for Dip:
3/4 Cup Plain Yoghurt
1 TBSP fresh Lemon Juice
1 Garlic Clove, minced
1 Tsp Ground Cumin
3/4 Tsp Coconut Sugar or Brown Sugar
Salt to taste
3 TBSP fresh Mint, finely minced
1/2 Tsp Dried Mint
Whisk together: yoghurt, lemon, garlic, ground cumin, sugar and salt. Add dry and fresh mint, hand mixing to combine and set aside covered in the fridge to allow flavours to permeate.
Meringues
Meringues
My Newly Discovered Fix
I was invited to a dinner the other day and volunteered to bring dessert. I chose Meringue Chantilly (from Our {Modern} Family Table, page 56). I began by making the Meringue Nests. They looked great but I had to try one as sometimes the bases can be rubbery, which apparently some people like - but not me! Of course, they had rubbery bottoms. So I googled around for a reason/solution and came across this (from Ricardo):
"The next day, if the meringue is not completely dry, dry it again at the same temperature until crisp. "
What did I have to lose?? I popped them back in a 170 Degree F oven for just over one hour, then turned the oven off and left them in with the door slightly ajar for another hour. I removed them and sampled another one ... crispy all the way through. They were perfect (thank heavens as I was eating the dessert I was suppose to take to dinner)!
Tuesday, December 15, 2015
Meringue Kisses
It's Christmas and I've tried a new recipe - a twist on an old recipe. They are tiny meringues with colourful stripes and flavours and no flour, yeah. Pictured are the Mint Meringues I made. I also made Almond Meringues with a green stripe. Red and Green - great combo for Christmas.

Ingredients
3 large egg
whites
Pinch salt
1/4 tsp. cream of
tartar
1/2 c. sugar
1/2 tsp. vanilla
extract
For Almond
1/4 tsp. almond
extract
Green food
colouring
For Lemon
2 tsp. freshly
grated lemon zest
Yellow food
colouring
For Mint
1/4 tsp. mint
extract
red food colouring
Directions
1
Arrange oven racks in top and bottom thirds of oven. Preheat to
225 degrees F. Line two large cookie sheets with parchment paper.
2
In medium bowl, with mixer on medium speed, beat egg white and
salt until foamy. Add cream of tartar; beat on medium-high until soft peaks
form. Add sugar 1 tablespoon at a time. Beat until meringue stands in stiff,
glossy peaks. Beat in vanilla and flavor of choice. Taste the meringue to test the strength of the flavour added. You may want a drop or two more flavouring.
3
For each color desired, using small brush, lightly paint 3 to 4
stripes of food coloring inside large piping bag fitted with 1/2-inch plain
tip. Divided meringue among piping bags. Pipe meringue into about 1/2 to 3/4 inch rounds
onto cookie sheets, spacing 1-inch apart. Bake 1 hour.
4
Turn oven off. Leave meringues in oven 1 hour with oven door
closed. Remove from oven; cool completely. Cookies can be stored in airtight
containers at room temperature for up to 2 weeks.
EACH MERINGUE About 5 cals, 2 g
carbs, 10 mg sodium.
Friday, November 13, 2015
Kristin's Banana Bread (Gluten Free)

Banana Bread
1 Cup Raw Sugar (we used 1/4 Cup and it was just fine)
1 TBSP Butter Regular or non-dairy) (we used Coconut Oil)
1 Cup Mashed Over-ripe Bananas (2 or 3)
1 Egg
1 Tsp Real Vanilla Extract
1 Cup Oat Flour (we ground whole flake oats in Magic Bullet)
3/4 Tsp Baking Powder
1/4 Tsp Salt
1/2 Cup semisweet Chocolate Chips (if desired)
Preheat the oven to 350˚F.
Combine all the ingredients in a bowl and mix well.
Cut a piece of parchment paper to fit the bottom of a loaf pan. Put it in the bottom of the pan and spray with cooking spray.
Pour in the batter and cover loosely with foil. (we didn't cover with foil, but if getting too brown, just lay foil over top while it cooks.)
Bake for 30 minutes.
Cool completely, then slice and serve.
Subscribe to:
Posts (Atom)