INTRODUCTION
Tuesday, January 28, 2025
Quiche Lorraine
QUICHE LORRAINE
A good dish to serve with a fresh salad on the side. This recipe comes from the once upon a chef web site. You can access it here:https://www.onceuponachef.com/recipes/quiche-lorraine.html and 3/4 of the way down watch a simple video.
It is one of the best recipes I have tried for Quiche. I tweak it a bit as noted, but still love the taste.
INGREDIENTS
- One 9-inch deep-dish frozen pie crust (My frozen pie crusts don't look as nice nor as deep as the photo on the their web site, but still do blind bake them)
- 8 oz thick-cut bacon (about 6 slices), diced (I usually use ham when it is on sale, cut a couple of slices and cube it)
- ½ cup chopped shallots, from 2 medium shallots (approx.)
- 4 large eggs (with my pie crusts I think 3 large eggs is sufficient)
- 1¼ cups heavy cream (again I reduce the heavy cream to 1 cup which is exactly 237 ml the 10% cream container is) (I believe the cream rather than milk makes the difference)
- ¼ teaspoon salt
- ⅛ teaspoon cayenne pepper
- Pinch ground nutmeg (I think this is the magic ingredient)
- 4 oz Gruyère, finely shredded (about 1¼ cups) (again, Gruyère is similar to Swiss which is usually cheaper - again I sometimes mix it with cheeses I already have in the fridge - ie cheddar, mozzarella etc)
- INSTRUCTIONS:
- 1. Blind bake the crust: Preheat the oven to 400°F and set a rack in the middle position. Remove the pie crust from freezer and thaw until just soft enough to easily prick with a fork, about 10 minutes. (If there are any cracks in the crust, see note below on how to patch them up.) Prick the bottom and sides all over with a fork. Place the crust on a baking sheet to make it easy to move in and out of the oven. Bake on until lightly golden, 10 to 15 minutes. Keep an eye on it; if it puffs up while cooking, gently prick it with a fork so it will deflate. (If it cracks while baking, see note below for instructions on how to patch it up.) Set aside and reduce the oven temperature to 325°F.
- 2. In a medium nonstick sauté pan over medium heat, cook the bacon, stirring occasionally, until crisp, about 10 minutes. Use a slotted spoon to transfer the bacon to a paper towel-lined plate to drain. Pour off all but one tablespoon of fat from the pan. Add the shallots and cook over medium-low heat until soft and translucent, 3 to 4 minutes. Do not brown. Remove the pan from the heat and set aside.
- NOTE: ham does not leave fat in the pan, so I add a bit of oil to pan, sauté onions, then add a few more veggies - mushrooms, broccoli for example - cook for a couple of minutes, then add the diced ham. Then set aside.
- 3. In a medium bowl, whisk the eggs. Add the heavy cream, salt, cayenne pepper, and nutmeg; whisk until evenly combined.
- 4. Spread the shallots evenly over the bottom of the cooked crust. Top with half of the bacon, all of the Gruyère, and then the remaining bacon. Pour the egg/cream mixture over top.
- 5. Slide the quiche (still on the baking sheet) into the oven and bake at 325°F for 45 to 50 minutes, until the custard is set and lightly golden. Serve hot or warm.
- Note: Don't panic if your crust has cracks -- you can easily fix it. Make a smooth paste by mixing 1 tablespoon of flour with 1 tablespoon of water. Use your fingers to patch up and fill any cracks, then proceed with the recipe. If the crust cracks while blind baking, patch it afterwards and place it back in the oven for a minute or so to set. It should be good as new.
- Note to Note: I sometimes have small cracks in the crust and find that when I cook the egg the cracks are not noticeable.
Thursday, January 12, 2023
Quesadilla a la my friend Sue
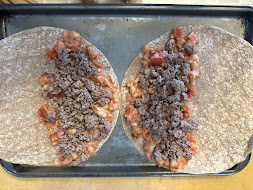
This is a great way to use up left over meat.
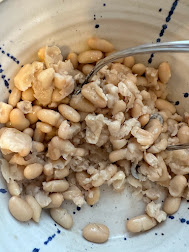
1. Mash beans. Today I used white kidney beans. Have also used red kidney beans in the past but any bean you like will do.
Thursday, November 04, 2021
ADULT H O T D O G S
Believe it or not, I made these for dinner one night with Shaun and family and they liked it. Great for a quick dinner (that dinner was on October 31st, just before Trick or Treating, so with veggies and dip it made a quick meal). And it is tasty. Remember Costco hot dogs?? I always bought one of those with sauerkraut, mmmmm.
Ingredients6
Large Hot Dogs
6 Slices of Bacon
Cheese of your choice (I use Old Cheddar)
Directions1.
Preheat oven to 400°F
Make a lengthwise slit in each hot dog making sure not to cut right through to bottom of weiner.
Cut cheese into skinny strips and insert in the slit of hot dog
Wrap each hot dog with bacon securing start and end with toothpick
Place on wire rack that is on top of cookie sheet (I put tin foil on bottom of sheet for easy clean up) and bake for 30 to 40 minutes, until bacon is cooked to your desired crispiness.
Toast buns if desired and insert bacon/cheese hot dog.
Serve with choice of condiments. I offer ketchup, relish, dijon mustard, sauerkrautk, freshly cut red onions.
Serve with fresh veggies and dip or hummus and there is your meal!
Saturday, March 21, 2020
No Knead Pizza Dough

No Knead recipes usually call for 18 hours of rest, plus another 2 to 3 hours after dough forms. Not anymore! I discovered this recipe on the Smitten Kitchen website and gave it a try today. Worked perfectly. This recipe makes two 12 inch round (or 9 x 13 inch rectangle) crusts.
What you need (knead???) to know:
There are three time options for this recipe which means whenever you get the idea to make your own pizza you can start the crust now!
Option 1: Overnight Dough.
Begin between 8 and 9 PM the evening before for dinner between 6 to 8 PM (approximately 22 hour dough)
Option 2: All Day Dough.
Begin between 6 and 8 AM that day for dinner between 6 to 8 PM (approximately 12 hour dough)
Option 3: Part-Day Dough: (This is the one I made)
Begin around noon that day for dinner between 6 to 8 PM (approximately 6 hour dough)
This looks like a long complicated recipe but really it is:
1. Mix all together in a large bowl
2. Let it rest for 6 to 12 hours depending on which option you choose..
3. Transfer from bowl to pizza pan, top with topping, and cook.
Easy as 1, 2, 3 !
Before you start TIPS:
I wish I had noticed the weight of the flour before I began making the dough. When I mixed the water into the dough, it seemed very dry, so I read through the instructions again and spotted this tip:
"Do keep in mind that 125 gram cups are light cups of flour — spoon-and-sweep or fluff-and-sweep style, and three cups packed more tightly (say, scoop-and-sweep) will indeed make the dough feel firmer. In the end, the dough should be mostly fine regardless, but I do feel that more damp doughs seem to have more of that crackly exterior/stretchy interior of dreamy pizza doughs. Hope that helps."
Of course I did the scoop and sweep and ended up with a dough that felt firm - too firm I thought (even though I didn't really know what I was doing), so added a bit more unmeasured water till it looked from this:
 from this... to this
Next time I will weight the flour and see if the measurements make a softer dough.
INGREDIENTS:
3 Cups (375 Grams) All-Purpose Flour (apparently Bread Flour works too ... I used 1/2 All-Purpose
and 1/2 Whole Wheat Flour and it worked just fine)
Slightly heaped 1/8, 1/4 or 1/2 Tsp Active Dry Yeast (for Overnight, All-Day or Part-Day
respectively)
1-1/2 Tsp Sea or Kosher Salt (I used Kosher)
1-1/4 Cups Water (plus an additional TBSP or two if needed)
INSTRUCTIONS:
In a large bowl mix the dry ingredients together with your hand. Add the water and continue mixing with your hand until a dough forms. The dough will be craggy and rough but if it feels excessively so, add another spoonful or two of water. (I probably added 3 tablespoons full in total). Cover the bowl with plastic wrap (sorry to the environmentalists ... I'm sure you can find a substitute for this wrap) and keep at room temperature for approximately 22 (for Overnight dough), 12 (for All-Day dough) or 6 (for Part-Day dough) hours, or until the dough has more than doubled. It takes longer in a chilly room and less in a very warm room.
After 6 hours, my dough looked like this:

The recipe says to "prepare pizza stone and paddle sprinkling it with cornmeal. You can also use any old baking sheet you have around, however, based on early commenters, the pizza tends to stick to these more, so I now recommend that you prepare it by very lightly, thinly coating it with olive oil or a non stick cooking spray before sprinkling it with cornmeal."
I used a round pizza pan and put parchment paper on the bottom and sprayed that with a bit of olive oil although I am not certain that was even necessary --- and no cornmeal.
Heat the oven to 500°F. If using a pizza stone put it in the oven so it heats too.
Flour your counter well. Scrape dough out of bowl onto floured counter. (Dough should have changed to a very loose, soft, sticky and stretchy dough) Flour the top of the dough and split it in half. Pat one half into a domed circle then lift the circle and insert your fist into the centre and let the dough stretch down on the sides. Do the same with the second piece of dough or wrap it up and put it in the fridge* to use in the next couple of days.

Spread this onto your baking sheet (I would think you would have to be very careful if using a hot pizza stone, being careful not to touch the stone when spreading it). Use floured fingers to press and nudge the dough into your desire shape.
Add desired fixings. I used pesto instead of tomato sauce, two kinds of cheeses - mozzarella and cheddar and the vegetables that needed eating in my fridge including spinach (which I sautéed slightly) and broccoli as well as others. I tend to heap my pizzas which I did here:

Drizzle with a bit of Olive Oil and pop in the oven for about 15 minutes. I found at such a high oven temperature, if I had left it in any longer, the bottom would have burnt, so be careful.
*Note: If you are using refrigerated dough, you should return it to room temperature by leaving it on the counter covered with a damp cloth for 2 to 3 hours before using it.
Jim Layhey of New York perfected the no-knead bread. Smitten Kitchen altered the recipe to make this no-knead pizza dough. And I altered it a bit as well. To see Jim's Youtube of bread making, click this link: https://www.youtube.com/watch?v=13Ah9ES2yTU


