Showing posts with label appetizer. Show all posts
Showing posts with label appetizer. Show all posts
Sunday, July 11, 2021
PROSCIUTTO WRAPPED ASPARAGUS

This is a very tasty and impressive and EASY appie to serve your guests. The prosciutto is salty so no extra salt is required.
INGREDIENTS
Asparagus Spears, preferably medium thickness (mine were very thin, so I used two in each wrap)
Slices of Prosciutto
Olive Oil
Lemon zest (optional)
Freshly grated Parmesan Cheese (optional)
METHOD
Heat oven to 400°F. Line a sheet pan with parchment paper and set aside.
Snap off the tough ends of the asparagus. Cut prosciutto slices in half down their length. Wrap each spear of asparagus with one strip of sliced prosciutto. Lay the wrapped spears on the lined sheet pan.
Bake for 8 to 10 minutes.
Transfer to a serving plate. Top with lemon zest and freshly grated parmesan cheese (if using).
Serve immediately while hot.
Tuesday, August 14, 2018
Scones
 Sorry I didn't take a better photo of these, but they didn't last long. I made these scones for my Summer Garden Tea Party and as you can see, served them with fresh fruit and Devonshire custard. They can also served with Clotted Cream (if you know what that is and where to purchase it!?!)
I made scones once before and they turned out like bricks. One must have scones for a Tea Party, so I was a bit nervous about making them again. I found a recipe on-line and they were easy to make and turned out perfectly. These are a bit different than the scones you buy in the stores here. Instead of being hard (and a bit dry) then are soft and quite fluffy in comparison. They also bake tall with a clear line in which you can easily pull them apart in half to eat.
The scones pictured above are small. They were dessert rather than the main food so I did make them much smaller.
The good thing about this recipe is:
1. You can make the dough ahead of time and freeze it. Then just bake before you wish to serve them.
I cut the dough into scones, placed them on the baking tray which I had lined with parchment paper, covered with Saran Wrap and froze. The next day, I just moved them from freezer to oven. Her recommendation was to bake 5 minutes longer. As mine were about half the size of regular scones, I found baking for about 7 minutes was all that I needed. For regular size scones, the Plus 5 Minutes probably works fine. Just keep an eye on them and remove before they get too brown.
2. It is easy.
Here is an excellent video on how to make these scones:
INGREDIENTS:
2 Cups All-purpose flour (10 ounces by weight)
4 tsp Baking Powder (use fresh powder, opened less than 6 months)
1/2 tsp Salt
1/4 Cup Sugar
6 Tbsp unsalted butter, AT ROOM TEMPERATURE (85.2 grams; 3 ounces)
2/3 Cup Milk
1 Large Egg
DIRECTIONS:
1. Preheat oven to 425°F.
2. In a food processor, pulse the flour, baking powder, salt and sugar a couple of times to combine.
3. Add the room temperature butter and pulse 7-10 times until the butter is completely distributed. You shouldn't see any chunks of butter and the mixture should have a sandy texture to it.
4. Transfer this to a large mixing bowl.
NOTE: If you don't have a food processor, using a large bowl, whisk the dry ingredients together and mix in the butter with a hand mixer to a sandy texture with NO butter chunks left.. Proceed with the recipe as follows.
5. In a small bowl, whisk to combine the milk and egg. Save 2 Tbsp of this for the egg wash later. (I forgot the egg wash and they still turned out nice and brown but would try to remember to use it next time!)
6. Pour the rest of the liquid mixture into the mixing bowl with the dry ingredients.
7. Stir to combine with a spatula, until a rough dough forms.
8. Transfer to a lightly floured countertop and knead about 10 times until the dough comes together into a relatively smooth ball. Take care not to knead too much or the dough will be tougher and not rise as high.
9. Roll the dough about an inch thick and use a 2.5" cutter to cut circles. USE AS LITTLE EXTRA FLOUR AS POSSIBLE AS TOO MUCH FLOUR WILL MAKE THE SCONES TOUGH. Re-roll the scraps and continue to cut circles. Push down with the cookie cutter, then straight up. DO NOT TURN to loosen the dough or the scones WILL NOT rise as they should.
10. Place the scones on a parchment or silicone line baking sheet. (This is the point at which I put my scones, baking sheet and all, in the freezer).
11. Brush the tops with the reserved egg wash.
12. Bake the scones for about 13-15 minutes, until about tripled in height and golden brown on the tops and bottoms. If frozen bake for about an extra 5 minutes until baked through.
Enjoy!
If you made them ahead and wanted to re-heat them put them in a 300°F oven for 5 to 10 minutes.
To freeze baked scones, put them in an air tight bag and freeze for up to 2 months.
Scones will keep at room temperature for a couple of days, in the fridge for a couple of weeks, in the freezer for a couple of months.
Friday, February 24, 2017
Gluten Free Banana Almond Bread

Seems my most delicious baked gluten free recipes are banana bread. Well, here is another one. Was pleased it used Almond Flour ae I am not partial to baking with the rice (or many other varieties of) flour. Below is a picture of the flour I used for this recipe. This was labelled "Raw" as the dark outer skin of the almond was not removed before grinding, therefore it is a bit heavier than normal ground almond flour, but it worked well in this recipe. I ordered it from Well.ca the online grocery store that delivers right to your door (or Post Office Box now-a-days) free of charge.


And not on a cooking note, if you are wondering what is in the background of the above photo of my slice of banana almond bread ... it is the Queen.

She sits on my window sill and waves while it is daylight.
GLUTEN FREE BANANA ALMOND BREAD
2 Cups (260 g) Almond Flour
1/4 Cup (35g) Cornstarch
2 Tsp Baking Powder
1/2 Cup (115g) Unsalted butter, softened
(I used Becel Margarine; it was already soft)
1/2 Cup (105g) Sugar (I used Splenda and used a little less)
2 Eggs
1-1/4 Cups (310 ml) very ripe mashed bananas (about 3 bananas)
2 TBSP Sliced Almonds (I only had slivered)
1 TBSP Almond Extract (I used Vanilla)
As you can see I altered the original recipe on my first go-round and it worked out perfectly. Don't be afraid to add perhaps nuts to the batter or perhaps chocolate chips. I haven't tried that yet but am pretty certain it would work out well. Below are the instructions.
- Instructions:
- With the rack in the middle position, preheat the oven to 350°F (180°C). Butter a six-cup (1.5 litre) 10 x 4-inch (25 x 10 cm) loaf pan and line it with a sheet of parchment paper, letting it hang over both sides.
- In a bowl, combine the almond flour, cornstarch and baking powder. Set aside.
- In another bowl, cream the butter and sugar with an electric mixer. Add the eggs, one at a time, and beat until smooth. Add almond extract. At low speed, stir in the dry ingredients alternately with the mashed bananas. If adding chocolate chips or nuts, dust them with a bit of flour, then fold into batter. Spread the batter into the pan. Sprinkle with the sliced almonds.
- Bake for about 55 minutes or until the loaf is golden brown and a toothpick inserted in the centre comes out moist but without lumps of batter. My loaf was ready in about 40 minutes.
- Let cool completely before removing from the pan.
Sunday, March 06, 2016
Roasted Brussels Sprouts with Pear and Cheese
ROASTED BRUSSELS SPROUTS with
PEAR AND CHEESE
An easy to make appetizer that not only looks attractive but tastes good to boot!

Brussels sprouts ready to bake.

After baking they become golden brown.

Assembled appetizer skewered with bamboo picks, ready to eat.
Ingredients:
15 or so fresh Brussels sprouts, cut in half
1 or 2 RED Pears (colour looks great in this appie), skin-on, sliced
Small chunk cheese, about 2 oz or 60 grams, sliced (I used Swiss but use your choice)
30 or so Dried Cranberries
Olive Oil
Sea Salt & Course Black Pepper
Heat oven to 400 Degrees F.
Place cut Brussels sprouts in a bowl and drizzle with olive oil and sprinkle with sea salt. Toss to combine.
Scatter seasoned Brussels sprouts on a foil lined baking sheet. Add a sprinkle of cracked pepper over the sprouts. (They will shrink as they roast, so don't be concerned about the size you start out with)
Bake sprouts in the over for about 20-25 minutes or until they begin to open up and take on a delicious gold colour. Be sure to check in on the sprouts somewhere around the half-way mark to give them a shake, stir or flip.
Remove sprouts from the oven and allow to cool slightly.
Meanwhile, slice pears and cheese.
Once sprouts are cool enough to handle, add a slice of pear to the cut side top of the sprout, followed by a slice of cheese and top with a cranberry. Hold the layers together with a toothpick.
Quinoa Balls with Dip
Quinoa Balls with Dip

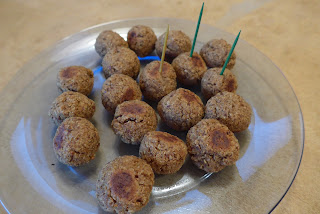

This is a great appie to serve. It is not only tasty but Gluten Free and Vegetarian!

Balls are baked on parchment paper.

Plated Balls.

Sorry, I keep forgetting to take a picture and by the time I remembered, half the plate was empty, but I'm sure you get the idea. Here they are served with dip and they were delicious.
Quinoa Balls with Dip
Ingredients for Quinoa Balls:
1 large Yellow Onion, diced
2-4 Garlic Cloves, smashed and salted
1-1/2 Cups Cooked Quinoa
1-1/2 Cups Pecans, skillet toasted (I used walnuts)
2 TBSP Coconut Flour
1/2 Cup Golden Raisins
1 Egg
1 Tsp Cinnamon
1/2 Tsp Ground Clove
1/2 Tsp Ground Turmeric
1/2 Tsp Sea Salt
Pinch Coarse Pepper
Preheat oven to 375 Degrees F.
Place raisins in a small bowl and cover with warm water to soften while you prepare remaining ingredients.
In a small bowl combine dry seasonings: cinnamon, clove, turmeric, salt and pepper and set aside.
In a small dry skillet, sauté nuts on LOW heat just until they become fragrant and lightly toasted (about 2-4 minutes), being careful to watch so they don't burn. Set aside.
In a separate large skillet set to medium-low heat, sauté the onions and garlic in some olive oil until translucent (about 8 minutes). Sprinkle the onion-garlic mixture with dry seasonings (cinnamon, clove, turmeric, salt and pepper) as it is cooking, mixing well to combine. Remove from heat.
When the onion-garlic mixture has cooled somewhat, add contents to the blender/food processor. Drain raisins, squeezing out excess liquid. Add drained raisins to onion mixture and process until the mixture is broken down and combined.
Add quinoa, coconut flour and toasted nuts and process until broken down and mostly combined (there should still be some texture, bits and pieces).
Put contents of blender/food processor into a large mixing bowl. Add egg and hand mix until well combined.
The mixture will be moist and sticky. If it is too difficult to work with (to form into balls) place in fridge for 20 minutes. (I've made it twice and both times was perfect to work with)
With the palm of your hands, roll about a tablespoonful of mixture into balls. Place on a parchment lined baking sheet and bake for 25-35 minutes until tops begin to brown and desired colour is achieve, shaking balls gently at the halfway mark. Be sure to keep an eye on these balls to prevent burning.
Remove tray from oven allowing the quinoa balls to cool slightly before serving with the yoghurt dip.
Store balls in fridge for up to three days.
Ingredients for Dip:
3/4 Cup Plain Yoghurt
1 TBSP fresh Lemon Juice
1 Garlic Clove, minced
1 Tsp Ground Cumin
3/4 Tsp Coconut Sugar or Brown Sugar
Salt to taste
3 TBSP fresh Mint, finely minced
1/2 Tsp Dried Mint
Whisk together: yoghurt, lemon, garlic, ground cumin, sugar and salt. Add dry and fresh mint, hand mixing to combine and set aside covered in the fridge to allow flavours to permeate.
Friday, November 13, 2015
Kristin's Banana Bread (Gluten Free)

Banana Bread
1 Cup Raw Sugar (we used 1/4 Cup and it was just fine)
1 TBSP Butter Regular or non-dairy) (we used Coconut Oil)
1 Cup Mashed Over-ripe Bananas (2 or 3)
1 Egg
1 Tsp Real Vanilla Extract
1 Cup Oat Flour (we ground whole flake oats in Magic Bullet)
3/4 Tsp Baking Powder
1/4 Tsp Salt
1/2 Cup semisweet Chocolate Chips (if desired)
Preheat the oven to 350˚F.
Combine all the ingredients in a bowl and mix well.
Cut a piece of parchment paper to fit the bottom of a loaf pan. Put it in the bottom of the pan and spray with cooking spray.
Pour in the batter and cover loosely with foil. (we didn't cover with foil, but if getting too brown, just lay foil over top while it cooks.)
Bake for 30 minutes.
Cool completely, then slice and serve.
Subscribe to:
Posts (Atom)