Showing posts with label Entrée. Show all posts
Showing posts with label Entrée. Show all posts
Monday, May 01, 2023
Slow Cooker Texas Pulled Pork
I am not big on pulled pork nor am I big on things made with BBQ sauce. This recipe has both and I LOVE it! Recipe calls for Pork Shoulder Roast. I used the sale slab of pork (I don't even know what it was called) and cooked it on the slowwwwww setting - i.e. 12 hours on low.

Ingredients
- 1 teaspoon vegetable oil
- 1 (4 pound) pork shoulder roast
- 1 cup barbeque sauce (I used "Dianna")
- ½ cup apple cider vinegar
- ½ cup chicken broth
- ¼ cup light brown sugar
- 1 tablespoon prepared yellow mustard
- 1 tablespoon Worcestershire sauce
- 1 tablespoon chili powder
- 1 small onion, or 1/2 large onion, chopped
- 2 large cloves garlic, crushed
- 1 ½ teaspoons dried thyme
- 8 hamburger buns, split
- 2 tablespoons butter, or as needed
Directions
1. Pour vegetable oil into the bottom of a slow cooker. Place pork roast into the slow cooker. In a bowl combine barbeque sauce, vinegar, chicken broth, brown sugar, yellow mustard, Worcestershire sauce, chili powder, onion, garlic, and thyme - mix well and pour into slow cooker. Cover and cook on Low for 10 to 12 hours or High for 5 to 6 hours until pork shreds easily with a fork.
2. Remove pork from the slow cooker, and shred the meat using two forks. Return shredded pork to the slow cooker, and stir to combine with juices.
3. Spread the inside of both halves of hamburger buns with butter. Toast buns, butter-side down, in a skillet over medium heat until golden brown. Spoon pulled pork into toasted buns.
4. Enjoy!
Saturday, March 21, 2020
No Knead Pizza Dough

No Knead recipes usually call for 18 hours of rest, plus another 2 to 3 hours after dough forms. Not anymore! I discovered this recipe on the Smitten Kitchen website and gave it a try today. Worked perfectly. This recipe makes two 12 inch round (or 9 x 13 inch rectangle) crusts.
What you need (knead???) to know:
There are three time options for this recipe which means whenever you get the idea to make your own pizza you can start the crust now!
Option 1: Overnight Dough.
Begin between 8 and 9 PM the evening before for dinner between 6 to 8 PM (approximately 22 hour dough)
Option 2: All Day Dough.
Begin between 6 and 8 AM that day for dinner between 6 to 8 PM (approximately 12 hour dough)
Option 3: Part-Day Dough: (This is the one I made)
Begin around noon that day for dinner between 6 to 8 PM (approximately 6 hour dough)
This looks like a long complicated recipe but really it is:
1. Mix all together in a large bowl
2. Let it rest for 6 to 12 hours depending on which option you choose..
3. Transfer from bowl to pizza pan, top with topping, and cook.
Easy as 1, 2, 3 !
Before you start TIPS:
I wish I had noticed the weight of the flour before I began making the dough. When I mixed the water into the dough, it seemed very dry, so I read through the instructions again and spotted this tip:
"Do keep in mind that 125 gram cups are light cups of flour — spoon-and-sweep or fluff-and-sweep style, and three cups packed more tightly (say, scoop-and-sweep) will indeed make the dough feel firmer. In the end, the dough should be mostly fine regardless, but I do feel that more damp doughs seem to have more of that crackly exterior/stretchy interior of dreamy pizza doughs. Hope that helps."
Of course I did the scoop and sweep and ended up with a dough that felt firm - too firm I thought (even though I didn't really know what I was doing), so added a bit more unmeasured water till it looked from this:
 from this... to this
It went from very very dry to just a wee bit sticky.
Next time I will weight the flour and see if the measurements make a softer dough.
INGREDIENTS:
3 Cups (375 Grams) All-Purpose Flour (apparently Bread Flour works too ... I used 1/2 All-Purpose
and 1/2 Whole Wheat Flour and it worked just fine)
Slightly heaped 1/8, 1/4 or 1/2 Tsp Active Dry Yeast (for Overnight, All-Day or Part-Day
respectively)
1-1/2 Tsp Sea or Kosher Salt (I used Kosher)
1-1/4 Cups Water (plus an additional TBSP or two if needed)
INSTRUCTIONS:
In a large bowl mix the dry ingredients together with your hand. Add the water and continue mixing with your hand until a dough forms. The dough will be craggy and rough but if it feels excessively so, add another spoonful or two of water. (I probably added 3 tablespoons full in total). Cover the bowl with plastic wrap (sorry to the environmentalists ... I'm sure you can find a substitute for this wrap) and keep at room temperature for approximately 22 (for Overnight dough), 12 (for All-Day dough) or 6 (for Part-Day dough) hours, or until the dough has more than doubled. It takes longer in a chilly room and less in a very warm room.
After 6 hours, my dough looked like this:

The recipe says to "prepare pizza stone and paddle sprinkling it with cornmeal. You can also use any old baking sheet you have around, however, based on early commenters, the pizza tends to stick to these more, so I now recommend that you prepare it by very lightly, thinly coating it with olive oil or a non stick cooking spray before sprinkling it with cornmeal."
I used a round pizza pan and put parchment paper on the bottom and sprayed that with a bit of olive oil although I am not certain that was even necessary --- and no cornmeal.
Heat the oven to 500°F. If using a pizza stone put it in the oven so it heats too.
Flour your counter well. Scrape dough out of bowl onto floured counter. (Dough should have changed to a very loose, soft, sticky and stretchy dough) Flour the top of the dough and split it in half. Pat one half into a domed circle then lift the circle and insert your fist into the centre and let the dough stretch down on the sides. Do the same with the second piece of dough or wrap it up and put it in the fridge* to use in the next couple of days.

Spread this onto your baking sheet (I would think you would have to be very careful if using a hot pizza stone, being careful not to touch the stone when spreading it). Use floured fingers to press and nudge the dough into your desire shape.
Add desired fixings. I used pesto instead of tomato sauce, two kinds of cheeses - mozzarella and cheddar and the vegetables that needed eating in my fridge including spinach (which I sautéed slightly) and broccoli as well as others. I tend to heap my pizzas which I did here:

Drizzle with a bit of Olive Oil and pop in the oven for about 15 minutes. I found at such a high oven temperature, if I had left it in any longer, the bottom would have burnt, so be careful.
Enjoy!
*Note: If you are using refrigerated dough, you should return it to room temperature by leaving it on the counter covered with a damp cloth for 2 to 3 hours before using it.
Jim Layhey of New York perfected the no-knead bread. Smitten Kitchen altered the recipe to make this no-knead pizza dough. And I altered it a bit as well. To see Jim's Youtube of bread making, click this link: https://www.youtube.com/watch?v=13Ah9ES2yTU
Monday, November 04, 2019
RIBEYE ROAST
I made this Roast for Shaun's Birthday. Yes, it is costly but if you do decide to make this roast, get the meat from a butcher rather than a grocery store. First I asked for a Prime Rib Roast. He asked if we were going to gnaw the bones and I said not really. He suggested cutting out the bone so I wouldn't be charged for the weight of the bone as well as the meat. This made sense so the Prime Rib Roast changed into a Ribeye Roast - name change by removing the ribs. I don't think you could do wrong with this. I have no photo as I had a lot of other things going on besides the roast for dinner and all the company I had but I can tell you that it was sooooooo good. Rest time is important as this allows the juices to stabilize and don't forget the roast will cook a bit more as it rests. IF you want a medium roast, take it out of the oven when the thermometer measures medium rare. I didn't believe that little bit of advice and took it out when it was getting close to medium and it was a bit over done, but no one complained (except me).
When buying a roast I was advised that 1 pound per person is the norm. I had 6 for dinner and there were leftovers (yum for me).
If I do make one again, I will try to take a photo of it, but usually with this type of meal, you are so busy that taking photographs is the last thing to think about.
INGREDIENTS
2 Tsp Kosher Salt (not fine salt)
1 Tsp Black Pepper
1 Tsp Garlic Powder
1 Tsp Dried Sage (I omitted sage as I didn't have it)
1 Tsp Dried Thyme (I used 1/2 tsp growing thyme)
3 lb. Ribeye Boneless Roast
(an to tell you the truth, I don't even know if it needs the sage and thyme)
(I doubled all ingredients as I had a 6 pound roast)
INSTRUCTIONS
1. In a small bowl mix together the salt, pepper, garlic powder, sage and thyme. Rub all over the Roast, pressing to make sure the rub adheres to the meat.
2. Place Meat, fat side up, on a rack in a roasting pan and allow to get to room temperature for about one hour.
3. Preheat oven to 500°F. Insert a meat thermometer into the middle of the roast and set the thermometer to 130°F (medium rare).
4. Place the Ribeye Roast in the 500°F oven and roast for 15 minutes.
5. Reduce the oven temperature to 350°F. Keep roasting the meat until the thermometer registers 130°F. For a 3 lb. roast this SHOULD take roughly 1 more hour (20 minutes per pound). But the only way to know for sure is to use a thermometer.
6. Remove the Ribeye Roast from the oven. Loosely cover it with foil and allow to rest for at least 20 minutes, then cut into thin slices (mine was cut into thick manly slices) and serve.
I served mine with Bearnaise Sauce, which you can either make yourself or buy the powdered packet from your local grocery store in the spice area and don't tell anyone you didn't make it yourself.
Thursday, December 06, 2018
Roast Pork Tenderloin
Roast Pork Tenderloin Ala Bev Bj
I dined at Bev's house this summer. She serve a Pork Tenderloin, roasted in the oven. It was tender, juicy and stayed that way even when we reheated the leftovers for dinner the next night. Delicious.
1. Marinate the Port Loin in a mixture of diced Garlic and Olive Oil. I put it in a plastic bag and refrigerated it overnight. Use as much or as little garlic as you like.
2. Bake the loin in a 425°F oven for 15 minutes.
3. Turn the oven down to 225°F and continue cooking for about 25 minutes per pound. Bev writes to kind of eyeball it after the first hour, depending on the size of the roast. Hers are usually 2 to 3 pounds.
Once pork had to be cooked till well done. That usually made it a bit tough and rubbery unless you were very very very careful. The doneness of pork has now changed. I like mine medium.
The following is taken from pork.org :
Pork today is very lean, making it important to not overcook and follow the recommended pork cooking temperature. The safe internal pork cooking temperature for fresh cuts is 145° F. To check doneness properly, use a digital cooking thermometer to measure the temperature at the thickest part of the cut without touching any bone. Once you have reached the desired internal temperature, remove from heat and let it rest for three minutes.
Fresh cut muscle meats such as pork chops, pork roasts, pork loin, and tenderloin should measure of 145° F, ensuring the maximum amount of flavor. Following these pork cooking temperature guidelines will not only result in a safe eating experience, but also preserve the quality of your meat for a juicy, tender, delicious meal.
Pork Cooking Temperature For Popular Cuts
| Cut | Temperature |
|---|---|
| Pork Loin/Tenderloin | 145° F – 160° F |
Tuesday, August 14, 2018
Noodles and Sour Cream
I just made a dish I haven't made in years. My mother used to make this with left-over broad egg noodles. I apparently don't make the same dishes as she did as I never have "left-over" broad egg noodles, but the other day had a yearning and made Noodles and Sour Cream.
I did have broad egg noodles so I boiled some up.
1. Boil broad egg noodles until as soft as you like to eat them. (Or use left-over noodles)

2. Drain noodles and rinse under cold water.

3. I like to add a dab of butter. I think it gives it a richer taste.
4. Then add a dollop of sour cream. Use as much or as little as your taste buds require.
5. Some people like also to add a bit of cottage cheese as well.
6. Mix well.

7. Add salt and pepper to taste. Serve and enjoy.
That's it.
It was quite the staple when Merv and I shared an apartment. Cheap, quick and tasty.
Tuesday, November 14, 2017
Chicken Breast

1. Adjust oven rack to lower-middle position and heat oven to 325 degrees. Line rimmed baking sheet with aluminum foil. Working with 1 breast at a time, remove any excess fatty skin from the thick end of the breast. Then, use your fingers, carefully separate chicken skin from meat. Peel skin back, leaving it attached at top and bottom of breast and at ribs. (I also used scissors to help peel back the skin.) Sprinkle salt evenly over all chicken, then lay skin back in place. This helps the breast to retain moisture.

Using metal skewer or tip of paring knife, poke 6 to 8 holes in fat deposits in skin, using an imaginary centre line from the top to the bottom of the breast. This allows any fat to drain. Arrange breasts skin side up on prepared sheet. Sprinkle skin with salt. Cooking them in a slow oven will prevent moisture loss while cooking the meat evenly from the thick end to the thin end. Roast until chicken registers 160 degrees, 35 to 45 minutes. It also allows the surface of the skin to dry out so that a quick sear in a hot skillet is all that is required for a crackly, beautifully browned finish. Remove from oven. They will look pale and uninteresting.
2. Heat a skillet over low heat for 5 minutes. Add oil and swirl to coat surface. Add chicken, skin side down, and increase heat to medium-high. Cook chicken without moving it until skin is well browned and crispy, 3 to 5 minutes. Using tongs, flip chicken and prop against side of skillet so thick side of breast is facing down; continue to cook until browned, 1 to 2 minutes longer. Transfer to platter and let rest for 5 minutes before serving.
This recipe results in crispy skin and juicy tasty chicken breasts. Add a sauce on the side if desired.
Tuesday, May 10, 2016
BBQ Beer Ribs
BBQ Beer Ribs

I made these ribs a few times and each time they turned out perfect. For 3 adults and 2 children (under 2 years old) I made 2 kilos of ribs and had only 2 pieces left over. I also halved the recipe below. I think the next time I make it I will use a bottled sauce and see how that goes as I am not overly fond of the beer sauce although I did enjoy my meal immensely.
Ingredients
3.6 Kg (8 lbs) Pork Baby Back Ribs
(I was told by the butcher in the grocers that Pork Back Ribs are the same as Baby Back Ribs)
Sauce
1 Cup Chili Sauce
3/4 Cup Brown Sugar
1 Cup Tomato Paste
2 Cups White or Pale Ale
6 Cloves Garlic, chopped
4 Tsp Dijon Mustard
4 Tsp Worcestershire sauce
2 Tsp Ground Ginger
1 Tsp Cayenne Pepper (optional) (I left out due to feeding babies)
1 Tsp Salt
You'll probably find that your ribs have a silver skin on the underside. It is suggested that this be removed as it prevents the sauce from penetrating the meat and when cooked it can become rubbery and a bit unpleasant to eat. I have both left the skin on and have removed it. I must admit the meat was very tender and easy to eat without the skin and the process is quite simple. Here is a Youtube lesson on silver skin removal:
https://www.youtube.com/watch?v=ZM2l2xr0Zhc
Directions:
1. Cut the meat between the ribs to get 3 bone pieces.
2. In a large pot, cover the ribs with lightly salted water. Bring to a boil and skim. Cover and simmer gently for 45 minutes. Drain. Set aside.
SAUCE:

3. In a saucepan bring all the ingredients to a boil over medium heat, stirring constantly. Simmer for 7 to 8 minutes.
4. In a large bowl combine the ribs with the sauce. If you have time, let rest in the refrigerator for several hours.
(Steps 1 to 4 can be made ahead, then put in the fridge to marinate and is ready to cook just before or when, the company arrives.)
5. With the rack in the middle position, preheat the over to 375°F. Line two baking sheets with aluminum foil.
6. Lay the ribs on the baking sheets. Cover with aluminum foil and bake for 40 minutes. Remove the foil and bake for 30 minutes or until the meat falls easily from the bone.

I'm getting better. There were two pieces left by the time I remember to take a photo!
I made these ribs a few times and each time they turned out perfect. For 3 adults and 2 children (under 2 years old) I made 2 kilos of ribs and had only 2 pieces left over. I also halved the recipe below. I think the next time I make it I will use a bottled sauce and see how that goes as I am not overly fond of the beer sauce although I did enjoy my meal immensely.
Ingredients
3.6 Kg (8 lbs) Pork Baby Back Ribs
(I was told by the butcher in the grocers that Pork Back Ribs are the same as Baby Back Ribs)
Sauce
1 Cup Chili Sauce
3/4 Cup Brown Sugar
1 Cup Tomato Paste
2 Cups White or Pale Ale
6 Cloves Garlic, chopped
4 Tsp Dijon Mustard
4 Tsp Worcestershire sauce
2 Tsp Ground Ginger
1 Tsp Cayenne Pepper (optional) (I left out due to feeding babies)
1 Tsp Salt
You'll probably find that your ribs have a silver skin on the underside. It is suggested that this be removed as it prevents the sauce from penetrating the meat and when cooked it can become rubbery and a bit unpleasant to eat. I have both left the skin on and have removed it. I must admit the meat was very tender and easy to eat without the skin and the process is quite simple. Here is a Youtube lesson on silver skin removal:
https://www.youtube.com/watch?v=ZM2l2xr0Zhc
Directions:
1. Cut the meat between the ribs to get 3 bone pieces.
2. In a large pot, cover the ribs with lightly salted water. Bring to a boil and skim. Cover and simmer gently for 45 minutes. Drain. Set aside.
SAUCE:

3. In a saucepan bring all the ingredients to a boil over medium heat, stirring constantly. Simmer for 7 to 8 minutes.
4. In a large bowl combine the ribs with the sauce. If you have time, let rest in the refrigerator for several hours.
(Steps 1 to 4 can be made ahead, then put in the fridge to marinate and is ready to cook just before or when, the company arrives.)
5. With the rack in the middle position, preheat the over to 375°F. Line two baking sheets with aluminum foil.
6. Lay the ribs on the baking sheets. Cover with aluminum foil and bake for 40 minutes. Remove the foil and bake for 30 minutes or until the meat falls easily from the bone.
Friday, March 25, 2016
Spaghetti with Fennel
This is a nice twist on tomato based spaghetti. I watch David Rocco on TV whenever I can. He is not only gorgeous to look at but he makes cooking look easy. He doesn't weigh or measure his ingredients, just tosses some of this and a pinch of that into the pan. I like cooking like that. So I watched as he made Spaghetti with Wild Fennel to serve to his friends in Italy. I tried it and love it.
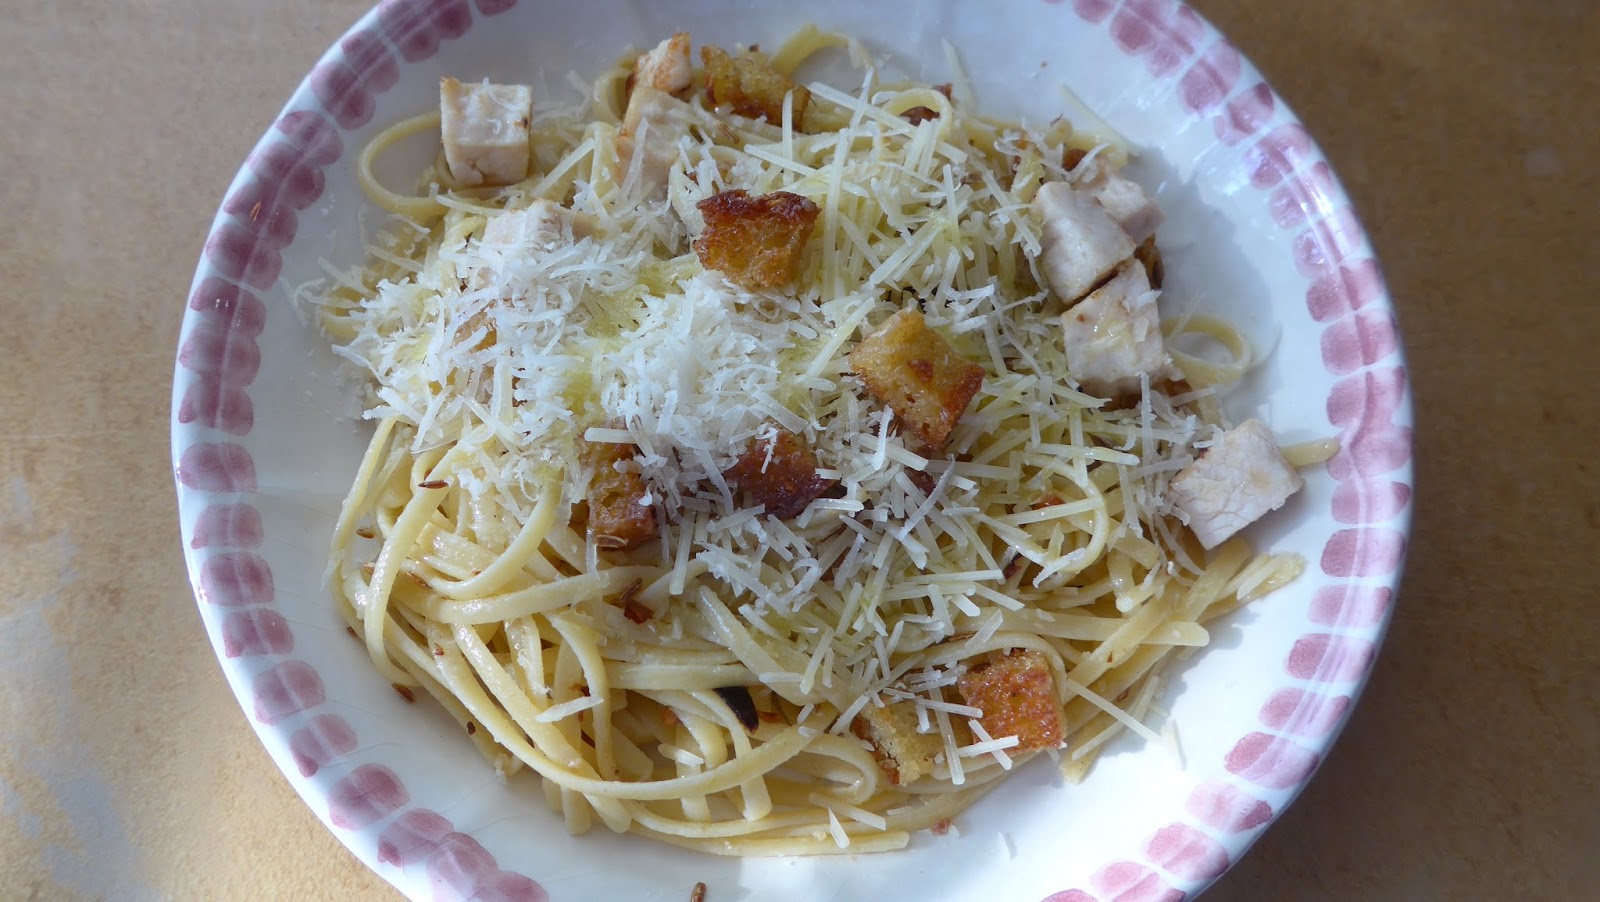
An easy dish to prepare and very tasty. As you can see, I used linguine (gluten-free of course) as I didn't have spaghetti pasta that evening and I also added cubed left over chicken which I added to the crouton pan to heat up.


I cubed my bread to a size I like. You can cut larger cubes or smaller cubes, your preference. I also chopped up some garlic (2 cloves).

I fried the cubed bread in olive oil along with the garlic.

My grated cheese was ready to go.

Voila! Dinner is served.
Ingredients:
All of these ingredients are approximate.
1 lb. spaghetti
3 TBSP Extra-virgin Olive Oil or a bit more
3 Cloves Garlic, chopped (I used 2, but also used 1/2 pkg of linguini)
1/2 Tsp Dried Chili Pepper Flakes
2 Tsp Fennel Seeds (I must have used a TBSP ... I love Fennel)
4 Oz. day old Bread, cut into cubes (the cube size is your choice)
Pinch of Salt
1 Small bunch of Wild Fennel
1/2 Cup freshly grated Pecorino (or other dry cheese, I used Parmesan)
Cook spaghetti pasta in rapidly boiling salted water to el dente.
In a pan, heat good quality extra virgin olive oil. Add a couple of cloves chopped garlic, some red chilli flakes, fennel seeds and simmer slowly to disperse the flavours.
Chop day old bread into cubes (big or small, the choice is yours) and fry them in the oil till golden. Add a bit of course salt.
Add the el dente spaghetti to the pan and finish cooking it in the olive oil sauce in the fry pan. Sprinkle with the extra wild fennel (if using), plate, then drizzle with a bit more olive oil and sprinkle on the grated cheese and enjoy.
Friday, March 11, 2016
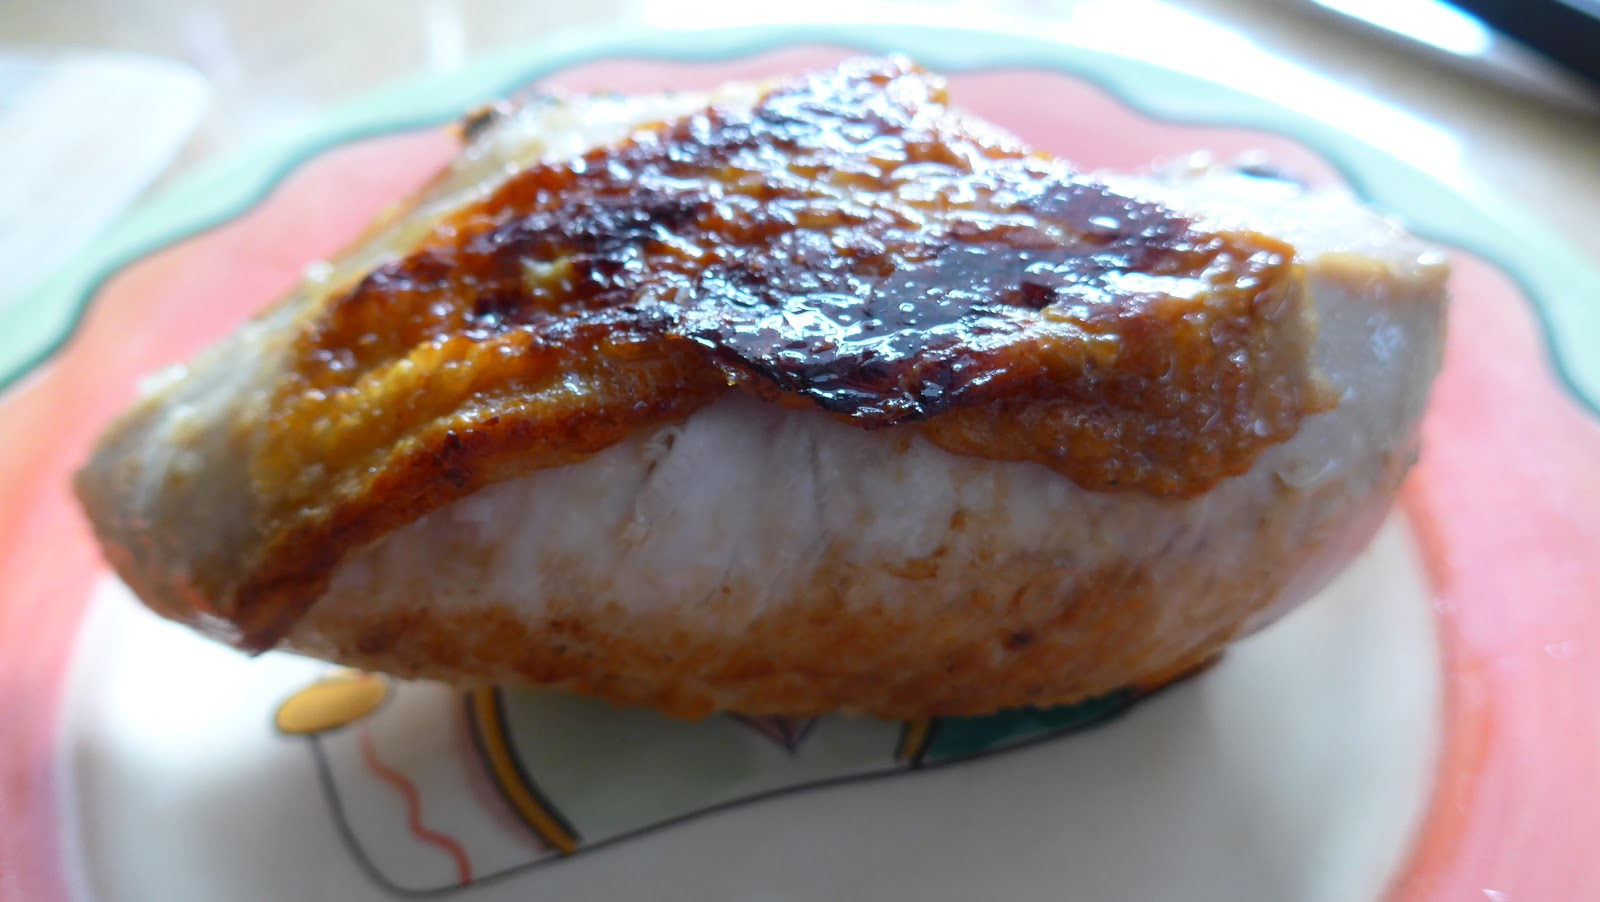
Roast Pork Shoulder
Roast Pork Shoulder

Pork Shoulder was on sale in the supermarket. I didn't quite know what it was but bought it anyway and found this recipe to cook it. I made it for Sunday Dinner and it was a huge success, moist and full of flavour.
Ingredients:
3 TBSP Olive Oil
3 TBSP chopped Garlic
Salt and freshly ground Black Pepper
1 (4 Pound) Pork Shoulder
Preheat oven to 425°F.
In a small bowl, mix together the olive oil, garlic, salt and pepper. Using a pastry brush (or your hands) spread the mixture all over the pork shoulder.
Set the meat on a rack set into a roasting pan. I lined the bottom of the roasting pan with tin foil for easy clean up. Roast for 20 minutes and then reduce the heat to 325°F. Continue to cook until a meat thermometer reads 180 - 185°F, about 4 hours - (so that is 20 minutes on high heat plus about one hour per pound to cook). Remove the pork from the oven and let stand until cool enough to handle and the juices have settled, about 30 minutes.
Subscribe to:
Posts (Atom)